Chile Pepper Seeds
It’s been quite cool here in South Florida during January, and now we’re set to get more near-freezing weather this week — it doesn’t bode well for chile peppers! I’ve got one out in the garden already — Thai Hot — but none of my other chile seeds (except for Pretty Purple Pepper) have germinated. My sweet peppers, on the other hand, have pretty much all germinated fine.
Hmm.
The Need for Heat
Thinking that warmth may be the issue (it’s been awfully cool inside the house as well), I decided to spring for a new seed germination heating pad. If you’re not familiar with them, they provide a gentle heat to the bottom of the seed tray. Think of these as heating pads for seeds!
Note: you cannot use a regular “people” heating pad to warm your seeds — they are not designed to operate 24/7 and the seed germination pads are. If you use a regular heating pad, you risk starting a fire (or at the very least developing hot spots and give too much heat to the little seeds).
Now my new one is about 20″ x 10″ in size, and I can put two of my 8″ x 8″ trays on it with room to spare. I generally like only only do smaller trays, in cycles. That way, while one tray is sprouted and enjoying the grow lights, I can be starting another set.
Today’s Chile Pepper Seeds
Some of today’s seeds are new (I just bought them recently) and some are from 10 years ago — treasured seeds that I can’t help but try and grow again.
The new seeds are:Â Cambuci Hot, Jalapeno M, mustard habanero, Peter Pepper and Bhut Jolokia.
The older seeds are: Tam Jalapeno, Jaloro, Hot-Banero and Brazilian Rainbow. The last two especially, since they were both from saved seed in my garden. Hot-Banero was the absolute hottest pepper I have ever grown and Brazilian Rainbow is rare. I’d love to see how my Hot-Banero stacks up against Mustard Habanero and Bhut Jolokia!
Unfortunately, it’s going to be awhile before I really can expect any “action” from my plantings. Chile seeds seem to take quite a bit longer than sweet peppers, so I’m thinking it will be around Valentine’s Day before I see the first of the chiles popping their heads above ground.
Germinating pepper seeds isn’t really hard, except for the waiting part. But given my weather of late, I’d have to wait to plant them even if they were already sprouted and grown enough.
Growing Peppers From Seeds, Part 2
I got a little carried away describing some different pepper seeds for different climates in my previous growing peppers from seeds post. So now let’s talk about the actual planting process.
What You Need
You’ll need the following to plant your pepper seeds. I germinate mine indoors, and then transplant them a little later. So here’s how to plant the seeds indoors, followed by directions for sowing seeds directly outdoors.
For indoors you will need:
- 3-ounce Dixie cups or windowsill seed starter tray.
- Spoon.
- Waterproof container to hold the cups (not needed if you are using the seed starter tray).
- Seed-starting soil or peat cylinders (comes with the seed starter tray).
- Hand sprayer that sprays a very fine mist of water.
- Scissors (if using Dixie cups).
- Seed packet(s).
Optional
- Labels to mark the pepper variety, plus a marker with waterproof ink.
Getting the Containers Ready
First, get the container(s) (Dixie cups or seed starter tray) ready with the soil, then dampen the soil. If you are using the Dixie cups, use the scissors to cut 4 small holes towards the bottom of the cups, for drainage. If you are using the seed starter tray, soak the peat cylinders in water according to the directions.
I like to use a small spoon to get the seed-starting soil into the Dixie cups.
If you are planting several varieties of seeds (which is what I like to do), you may want to label your containers with the varieties. You can use the waterproof markers and labels for the Dixie cups, or sketch a simple diagram of the windowsill seed starter tray.
Planting the Pepper Seeds
Once the soil or cylinders are damp. place the seeds in the cups/cylinders. I tend to plant 3 seeds in each Dixie cup, thinning to the strongest if they all germinate. Follow the directions as to number of seeds for the seed starting tray.
For the Dixie cups, you then want to place a fine layer of soil over the seeds. Don’t make it too deep, or the seeds will lose their strength just trying to get above ground.
When you are done planting, spray a fine mist of water over the soil. If you’re using the Dixie cups, put them in a waterproof container.
Then put some water at the bottom of the seed starter tray or the waterprood container. You want to water from below, to encourage the tiny plants to grow their roots deep instead of shallow. But be careful not to drown them! You want the soil damp, not wet.
You’re done! Now put the tray or container in a spot where it will be warm. When the seeds start to germinate, move them to somwhere where they will get plenty of indirect sun, or under grow lights.
Growing Peppers by Sowing Outside
It’s actually fairly simple to sow directly outside, but you must wait until all danger of frost is past, and the soil needs to be at least 60 degrees warm. Pick a sunny spot where the pepper plants will get plenty of sun.
Your biggest job will be preparing the soil outside. You want it loose enough so that the peppers can poke their heads above soil easily, but with enough nutrients to keep them going.
When I planted my peppers outside, I put plenty of compost and cow manure into the soil, then thoroughly mixed it to a depth of 6 inches. Depending on your soil, you may or may not need a tiller to help you with this. Dampen the soil when you are done; you want it moist, not wet.
Once your soil is prepared, plant your seeds about 18 inches apart. I like to plant three seeds in each set, then thin to the strongest one.
Cover the seeds with a fine layer of seed-starting soil, which makes it easier for the young plants to poke their heads above ground once they germinate. Mist with a sprayer until the soil is damp over the seeds.
And Now the Hard Part
The hardest part is waiting for the seeds to germinate. I’ve had them take as few as 5 days to as long as 3 weeks, and different varieties take different lengths of time to germinate. Just be patient and keep the soil moist.
There you go — planting your pepper seeds! If you’d like more detail on planting seeds of any kind, one book I like a lot is The New Seed Starter’s Handbook. Very detailed, you’ll be growing your own garden from seed in no time!
Growing Peppers From Seeds
Growing peppers from seeds isn’t as hard as you might think. The absolute hardest part is waiting for the seeds to germinate and poke their little heads above ground! (Well, that’s the hardest part for me, at any rate.) 🙂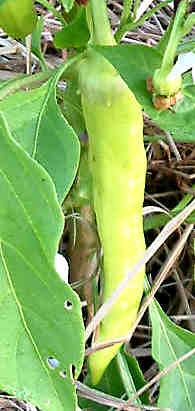
So let’s take a look at what needs to happen in order to grow pepper plants from seeds.
Pick Your Pepper (Seeds)
First is to consider your climate, and where you plan to grow your pepper plants. Pepper plants love sunlight and warmth, so if you live in the Pacific Northwest, you’re a bit more challenged than someone who lives in the desert Southwest or Deep South.
If you live in a cooler climate, pick plants that produce peppers early in the season. It will take longer for the peppers to grow and mature, so an early season pepper is best. For sweet peppers, you may want to take a look at sweet banana peppers. These peppers are prolific and bear pretty early.
(Note: You don’t have to live in the Pacific Northwest to enjoy this pepper — you can grow it about anywhere.)
One further note about the Pacific Northwest climate is that hot chile peppers won’t get as hot where you live, compared to if you grew them in a warmer climate. Not sure why that happens, but be aware of it. Of course, deppending on the variety, they can be pretty hot anyway!
OK, say you live in a moderate climate; congratulations, you can grow about anything! If you have a fairly short Summer, you may want to stick with the earlier varieties (less than 60 days from transplant). But if you have a longer Summer, take your pick! One early-to-mid season bell which ripend to red that I like is called
Keystone bell pepper.
If you’re looking for a neat hot chili pepper to grow that produces and produces and then produces some more, think about Jalapeno M.
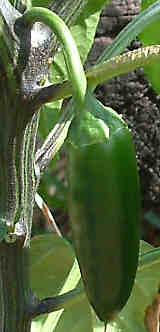 Every time I have grown jalapenos, the plants have produced beyond expectations. I’ve always had plenty to eat, and plenty to share with family, friends and neighbors. In fact, one plant (planted in the garden in a large hole filled with compost) had so many peppers I almost considered selling them (the peppers, that is). It grew huge and was covered with jalapenos.
OK, so most of my jalapeno plants didn’t go to quite those lengths, but each one has produced plenty of peppers for eating and sharing.
OK, you’re in the really southern climates with long summers and mild winters. You can grow just about anything as well, but hot chile peppers in particular love the climate. Of course, being a hot, hot, hot pepper lover, I choose habaneros and scotch bonnets. A nice one is Hot Paper Lantern habanero.
A word of warning for those of you who live in super-hot climates with strong summer sun — think about growing your peppers in dappled shade, or so they don’t get full sun from about noon to three. Living in South Florida, my summertime peppers do much better if they aren’t in full sun during the hottest part of the day.
And if anyone wants to check out more pepper seeds, take a look at this link for all kinds of pepper seeds.
To Be Continued…
This post has gotten longer than I had planned, so here’s part two of growing peppers from seeds, with the actual planting instructions.