Soils and Soil Amendments

What’s the dirt on soil and amendments? Do you just need “plain old dirt” or some fancy mixture in order to get a nice harvest of peppers? Let’s get down and dirty, and talk about soils and amendments.
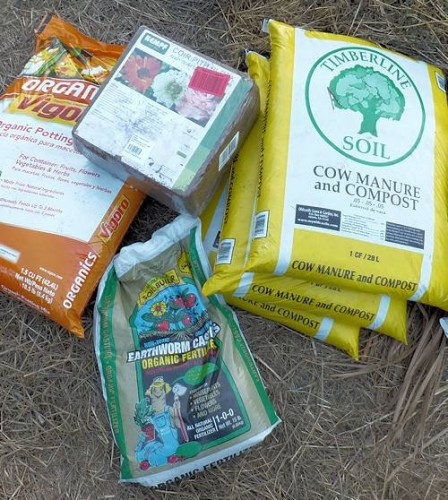
Some soil amendments, including coconut coir, earthworm castings and composted manure.
Three Main Soil Types
In the grand scheme of things, there are three main soil types found in nature. Yes, there are lots of sub-types, but they all ultimately fall into these three:
- Sandy: Whether coarse or fine grained, sand is most notable for its drainage, which is excellent. Unfortunately, it’s usually a little too excellent, and your plants get thirsty again a short time later.
- Clay: Clay, on the other hand, keeps moisture in the soil…a little too efficiently. Clay soils stay wet for a long time, and they compact easily, so plant roots have a tough time trying to get air.
- Loam: What we all wish we had! Loam has good drainage, but keeps moisture in the soil. It’s “fluffier” and although it will compact down, it doesn’t do it as readily as clay.
If you’ve got an in-ground garden and have sandy or clay soil, they would both benefit from adding some good-quality compost. Compost has the effect of trapping moisture in sandy soils, while “fluffing” up clay soil. And what about loam? Adding compost at least once a year to your beds will help to keep your loam in top condition.
But…what if you have a raised bed or container garden?
Soils for Containers and Raised Beds
First, it’s more appropriate to call what’s put into raised beds and containers a “potting mix”. That’s because there’s usually very little soil in the mix.
These potting mixes are usually composed with some combination of:
- Compost:Â Used for adding structure to the mix.
- Vermiculite or Perlite:Â Used to provide air space for roots.
- Peat Moss or Coconut Coir:Â Used to help retain moisture in the mix.
There are other goodies that can be added, but these are the main ingredients.
Yes, there are all kinds of recipes for the above. The most well-known is called “Mel’s Mix” which is 1/3 vermiculite, 1/3 peat moss and 1/3 blended compost. My personal favorite includes some additional amendments.
Soil / Mix Amendments
These are “goodies” added to the soil that aid the plant’s nutrition in some way. The most common is earthworm castings, which both conditions the soil / mix as well as provides some organic fertilizer. Another amendment along these lines is kelp meal
Something newer to the world of gardening are the rock dusts. These are full of trace minerals that tend to be missing from pretty much all soils and mixes. These rock dusts range from dolomite limestone (found in most garden centers) up through mixes like Azomite, Elemite and Gaia Green Glacial that tend to be more difficult to locate (I get mine from Amazon and/or Ebay, since I can’t find them locally).
Earthworm castings and kelp meal are pretty well-recognized as being useful soil / mix amendments. Rocks dusts? I am currently running some tests, and although initially encouraging I still have more testing to do. However, I do hear a lot of good things about rock dusts. In fact, Earthboxes come with a package of rock dust with 16 trace elements, so it’s definitely gaining in popularity. I’ll be doing a post on rock dusts at some point.
Where is the Fertilizer?
Yes, technically you could call fertilizer (N-P-K) a soil amendment, but that’s a subject that calls for its own post. And in fact, I do have one on organic fertilizers, if you’d like to read it.
Should You Add Soil Amendments?
Whether you have in-ground garden beds, containers or raised beds, it’s probably a given that you need amendments of some sort. The question is what kind and how much?
Compost is what I’d recommend for pretty much anyone. After that, it’s a matter of what you can afford, although minimally I would suggest vermiculite and/or perlite for aeration if you have heavier clay soil, and peat moss or coconut coir for sandy soils to help hold in some moisture.
Earthworm castings and kelp meal are excellent soil conditioners, while the rock dusts add the trace minerals.
Can your grow your peppers in less than optimal soil? Sure you can; it’s more a matter of what kind of harvest you want. Adding soil amendments help your plant to grow healthier, which in turn lets the peppers flower and fruit more.
Growing Peppers in Containers, Part 2

This is an update to my original growing peppers in containers post, as it’s been awhile since I did the original post. I’ve tried a few different techniques, and a few new products, so I want to offer more tips.
In addition to the tips for standard container growing, I’m also going to talk a little about intensive container growing.
Container Size
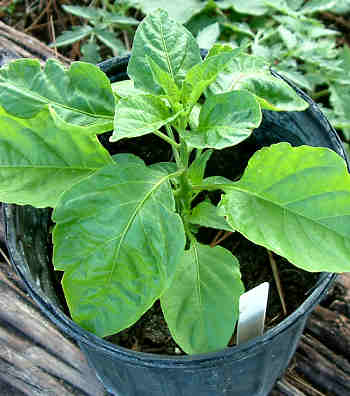
A Bhut Jolokia plant, almost ready to be put into its final container home.
I know I originally said that you could use a 2 gallon pot for the small (under 12 inches fully grown) peppers. While that is still true, I’m erring more on the side of giving the plant room to grow. Now I’ll say a 3 gallon pot for the smallest peppers and 5 gallon pots for an average size pepper.
The ones that can threaten to take over the garden with their potential size (jalapenos come to mind), I’d go with a 7 gallon if you want to limit the size a bit, but still keep a good harvest. Then if you want to let the plant really grow and then cage it (like with a tomato cage), then use a 10 gallon container.
You can also think about using a really big container (like 20 or 25 gallons) and putting multiple plants in it. For example, maybe something like a super-hot pepper in the middle, with some smaller ornamental (no heat) peppers around it. That way you get your hot-hot-hot peppers growing, but you don’t have to worry so much about brushing up against it an getting the hot oils on your skin or clothing. Plus, it looks really nice!
Intensive Growing
I’m also experimenting with a more intensive-type of a growing setup. I believe in giving the plants what they want to thrive (like sunshine, water and organic fertilizer). My fertilizers of choice are fish emulsion and kelp/seaweed emulsion. Still, I got to wondering if I could still be organic (or at least mostly organic), yet still increase my harvest — without increasing container size?
So, I’ve done some research and am setting out to run some tests on growing multiple plants — multiple of the bigger plants — in a single 20 gallon container. I’ve ordered my soil amendments (worm castings and Azomite
), and will be mixing it in with my potting soil / compost mix. If you’re looking for more info, check out my post on soil amendments.
Think of it as organic square foot gardening…without the squares. In any case, I’ll keep you posted on how it works.
Container Material
I really didn’t discuss this previously, as all I mostly used plain black plastic pots. But, there are other kinds of containers out there, so let’s talk about them.
Clay pots can be glazed (shiny) or unglazed (matte). Terracotta pots are what most people think about when they hear “clay”. If you use a glazed clay container, it must have holes in the bottom so that water can drain out; otherwise, you run the risk of drowning your peppers as glazed clay doesn’t “breathe”!
Unglazed pots should still have a drainage hole, but because the clay allows air to pass in, there is more air circulation for the roots — a good thing. The not-so-good side is that unglazed clay containers are notorious for drying out fast, so you will very likely have to water more often.
Self-watering containers are out on the market, and a lot of people swear by them. I have a friend who uses the Earthbox self-watering containers and she loves it (and grows some awfully nice veggies). She keeps it on her back patio, so has easy access to it. They are a bit on the pricy side, but I just bought one anyway, to put in the greenhouse — I am curious how it will stack up against some of my other kinds of containers that will be there. As an FYI, the Earthbox containers use 2 cubic feet of soil — that’s about a 15 gallon size. (1 cubic foot equals just shy of 7.5 gallons).
There are also more traditional self-watering planters, with a smaller size. It’s just a wee bit difficult to know exactly how much soil these hold, without knowing for sure how much space the soil has versus how much of the container is for the water. When in doubt, go bigger. A 14 inch diameter is the smallest I (personally) would go.
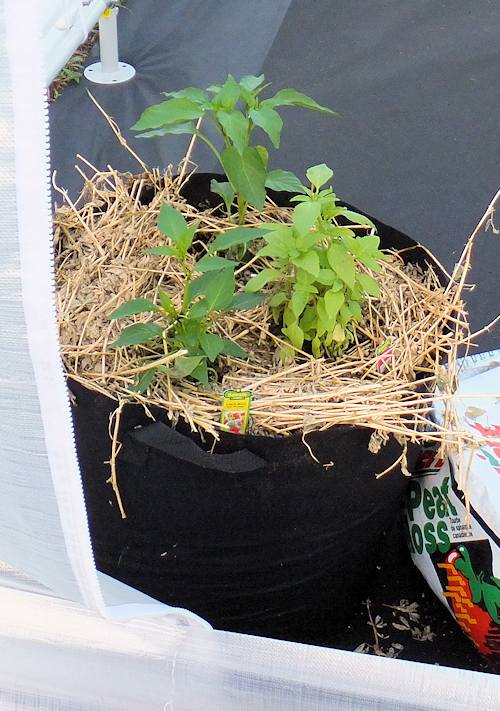
Here is a grow bag / smart pot with peppers and basil. This one is the 12-gallon size.
The containers known collectively as “grow bags” or “grow tubs” are made of a material that kind of feels like a very thick felt. They are also called “Smart Pots“. The material is breathable, so lets oxygen in, like unglazed clay pots. However, the new material is supposed to be better at maintaining the moisture level in the soil, and it’s very definitely lighter in weight — clay is much, much heavier to move around. The grow bags are also billed as helping the plants to build a better root system, and insulating the roots better than traditional materials.
At any rate, I got myself a bunch of them, from 12 gallons all the way up to 25 gallons, to use with my peppers and tomatoes. So far I am liking the 15 gallon size the best, as I will be able to get two medium-sized peppers in one container, in less space than two side-by-side 5 gallon containers. I’ll put some of the grow bags outside in the main garden area, as well as some in the greenhouse.
And of course there is the ubiquitous plastic container. They are usually pretty inexpensive, and are light in weight (and thus easier to move when full of soil). It can be a little difficult to find the larger sizes (15 gallons and up), but a local nursery may have some they would sell you. The plain black ones will be the least expensive, while the colorful “decorator” ones will cost more. Naturally, I will have a bunch of these in the greenhouse and main garden area. And of course — always check to make sure there is a drainage hole.
How Does Your Greenhouse Grow?

I mentioned in the previous post that I was the delighted recipient of a greenhouse, which I would be using for my Fall gardening. So let’s talk a little about greenhouse gardening in general, and peppers in particular!
Greenhouse, Growhouse – What’s the Difference?
I don’t guess there’s a ton of difference between a “greenhouse” and a “growhouse”, but here’s how I make the distinction. A greenhouse is typically a structure that is solidly anchored to the ground, with glass or transparent polycarbonate panels. A growhouse is a structure that is movable, but that can be anchored to the ground. It usually does not have glass, but a transparent or translucent enclosure.
(By that description, I have a “growhouse”, although mine is securely anchored to the earth.)
Still, I’ll use the term “greenhouse” through the rest of this post, as they are pretty much used the same, and that is for growing plants in a controlled environment. They can be have beds of soil in the ground, raised beds, containers or hydroponics. Not to mention all kinds of combinations!
Why Use a Greenhouse?
It’s pretty obvious that in a colder climate that one really good reason for “plants under glass” is to extend the growing season. If you live in a part of the world that gets less than 90 frost-free days, you’ve got a short planting season, which limits what you can bring to harvest. Or, you may be in a very windy location, with extremes of heat and cold.  Could be that you’re like me and it’s almost too hot and wet during parts of the year for good growth.

The start of setting up the greenhouse (still a long way to go in setting up all the containers and cleaning up). The cover looks white from a distance, but inside it’s translucent and very bright.
There are lots of reasons for using a greenhouse, and as an FYI, they don’t have to be expensive! I know, I love the looks of some of the decor greenhouses, with fieldstone or cedar and huge expanses of glass. They can run from $800 up to $20,000+.
I don’t have that kind of money, so I went the inexpensive route — the 10’x10′ greenhouse, anchors and misting system all together were around $300. OK, I forgot to include the ground cloth (add an extra $40), but that was a personal choice, since I am going with using containers.
 Peppers Under Glass
Let’s talk growing peppers now. As you probably know, peppers love the heat and do best in a warm climate. I have to admit, Southern Florida is warm, and sometimes even my plants melt in the heat in the middle of July. While I have grown peppers outside in the winter, they typically languish around until the nights are consistently above around 50 degrees F.
(I had one bell pepper plant that set a small pepper in January and if that fruit got any bigger during February, I couldn’t tell. But come the middle of March, all the sudden that fruit got larger and larger and then the plant exploded with new growth and more flowers and fruit.)
I was in the greenhouse this weekend with the door and window open and it was plenty hot — I had to turn on the misting system to take the temperature down a notch. This winter, I should be pretty easily be able to maintain 50+ degrees at night, after closing the the door and window and even moving in gallon bottles of sun-warmed water on the nights when it’s especially chilly. (Worst comes to worst, I can always get a space heater and keep the plants company, LOL.)
I don’t have any peppers moved in yet (the greenhouse was a surprise), but I do have some pepper seeds started in it. I may have to break down and get myself a pepper plant from the lawn and garden shop, so I can fuss over it while waiting for the current seeds to germinate. 😉
Let There Be Light!
If you decide that you want to explore getting a greenhouse and you live north of, say, Georgia, you may also have to think about supplemental lighting. Me, even during the winter I get 9 or 10 hours of sunlight, but most people aren’t that lucky. And when you can’t provide your pepper plants with at least 6 hours of sunlight a day, your plants are not going to thrive.
Fortunately, fluorescent lighting has gotten fairly inexpensive. The problem can be where your greenhouse is in relation to an electrical outlet! If you’re in a structure attached to your house, you’re in luck. If not, you’ll have the expense of running a line out to the greenhouse.
So how does your greenhouse grow?