Growing Peppers in Containers, Part 2

This is an update to my original growing peppers in containers post, as it’s been awhile since I did the original post. I’ve tried a few different techniques, and a few new products, so I want to offer more tips.
In addition to the tips for standard container growing, I’m also going to talk a little about intensive container growing.
Container Size
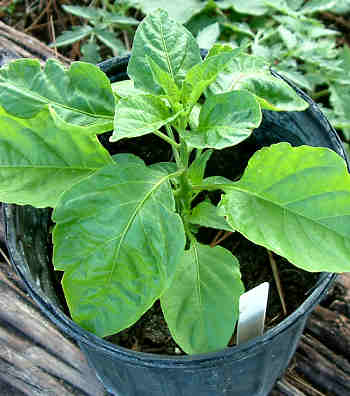
A Bhut Jolokia plant, almost ready to be put into its final container home.
I know I originally said that you could use a 2 gallon pot for the small (under 12 inches fully grown) peppers. While that is still true, I’m erring more on the side of giving the plant room to grow. Now I’ll say a 3 gallon pot for the smallest peppers and 5 gallon pots for an average size pepper.
The ones that can threaten to take over the garden with their potential size (jalapenos come to mind), I’d go with a 7 gallon if you want to limit the size a bit, but still keep a good harvest. Then if you want to let the plant really grow and then cage it (like with a tomato cage), then use a 10 gallon container.
You can also think about using a really big container (like 20 or 25 gallons) and putting multiple plants in it. For example, maybe something like a super-hot pepper in the middle, with some smaller ornamental (no heat) peppers around it. That way you get your hot-hot-hot peppers growing, but you don’t have to worry so much about brushing up against it an getting the hot oils on your skin or clothing. Plus, it looks really nice!
Intensive Growing
I’m also experimenting with a more intensive-type of a growing setup. I believe in giving the plants what they want to thrive (like sunshine, water and organic fertilizer). My fertilizers of choice are fish emulsion and kelp/seaweed emulsion. Still, I got to wondering if I could still be organic (or at least mostly organic), yet still increase my harvest — without increasing container size?
So, I’ve done some research and am setting out to run some tests on growing multiple plants — multiple of the bigger plants — in a single 20 gallon container. I’ve ordered my soil amendments (worm castings and Azomite
), and will be mixing it in with my potting soil / compost mix. If you’re looking for more info, check out my post on soil amendments.
Think of it as organic square foot gardening…without the squares. In any case, I’ll keep you posted on how it works.
Container Material
I really didn’t discuss this previously, as all I mostly used plain black plastic pots. But, there are other kinds of containers out there, so let’s talk about them.
Clay pots can be glazed (shiny) or unglazed (matte). Terracotta pots are what most people think about when they hear “clay”. If you use a glazed clay container, it must have holes in the bottom so that water can drain out; otherwise, you run the risk of drowning your peppers as glazed clay doesn’t “breathe”!
Unglazed pots should still have a drainage hole, but because the clay allows air to pass in, there is more air circulation for the roots — a good thing. The not-so-good side is that unglazed clay containers are notorious for drying out fast, so you will very likely have to water more often.
Self-watering containers are out on the market, and a lot of people swear by them. I have a friend who uses the Earthbox self-watering containers and she loves it (and grows some awfully nice veggies). She keeps it on her back patio, so has easy access to it. They are a bit on the pricy side, but I just bought one anyway, to put in the greenhouse — I am curious how it will stack up against some of my other kinds of containers that will be there. As an FYI, the Earthbox containers use 2 cubic feet of soil — that’s about a 15 gallon size. (1 cubic foot equals just shy of 7.5 gallons).
There are also more traditional self-watering planters, with a smaller size. It’s just a wee bit difficult to know exactly how much soil these hold, without knowing for sure how much space the soil has versus how much of the container is for the water. When in doubt, go bigger. A 14 inch diameter is the smallest I (personally) would go.
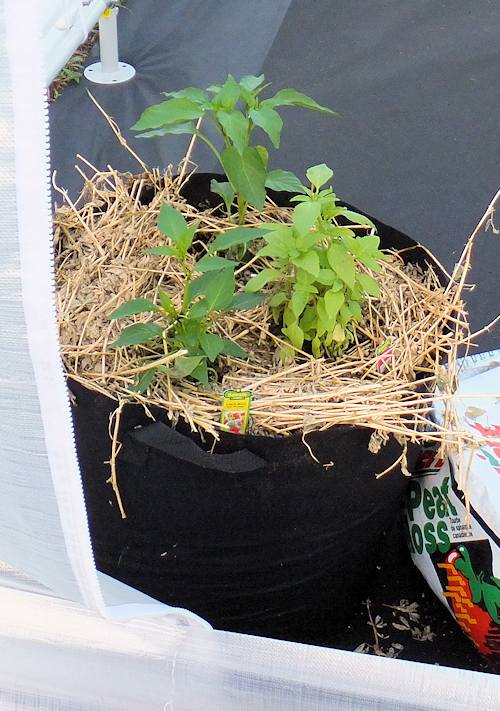
Here is a grow bag / smart pot with peppers and basil. This one is the 12-gallon size.
The containers known collectively as “grow bags” or “grow tubs” are made of a material that kind of feels like a very thick felt. They are also called “Smart Pots“. The material is breathable, so lets oxygen in, like unglazed clay pots. However, the new material is supposed to be better at maintaining the moisture level in the soil, and it’s very definitely lighter in weight — clay is much, much heavier to move around. The grow bags are also billed as helping the plants to build a better root system, and insulating the roots better than traditional materials.
At any rate, I got myself a bunch of them, from 12 gallons all the way up to 25 gallons, to use with my peppers and tomatoes. So far I am liking the 15 gallon size the best, as I will be able to get two medium-sized peppers in one container, in less space than two side-by-side 5 gallon containers. I’ll put some of the grow bags outside in the main garden area, as well as some in the greenhouse.
And of course there is the ubiquitous plastic container. They are usually pretty inexpensive, and are light in weight (and thus easier to move when full of soil). It can be a little difficult to find the larger sizes (15 gallons and up), but a local nursery may have some they would sell you. The plain black ones will be the least expensive, while the colorful “decorator” ones will cost more. Naturally, I will have a bunch of these in the greenhouse and main garden area. And of course — always check to make sure there is a drainage hole.
Growing Thai Hot Peppers

Growing Thai Hot Peppers means you’re growing a delight.  The low-growing plant blossoms profusely and produces a bounty of bright red peppers, pointing upwards.
A Little About the Peppers
 Thai Hot is equally at home in a container or in the ground. A three-gallon container will suit this pretty little pepper just fine. You might even be able to get away with a 1-gallon container, if you keep it well-watered and fertilized.
I have the plant in the photo (and by the way, you can click on the photo to see a larger picture) growing in the ground, and it’s about 8-inches tall. It’s also spread about 7 inches in diameter.
Now in the photo you only see 3 red peppers, but see all those blossoms and blossom buds? In a couple of weeks, the plant will be covered with peppers.
Can You Eat the Peppers?
Sure you can, but be warned –they aren’t called “Thai Hot” for nothing! One chopped pepper (with seeds) can easily season a large bowl of chili.
Speaking of the peppers, they are only about 3/4″ tall. They aren’t large, but they are potent.
But the charm of these peppers is ornamental. They make a great garden border, looking like bright red flowers. And of course, you could each day pick a few of the peppers in the border and you’d never see a difference.
Growing Thai Hot Peppers
My pepper plant survived some very chilly weather early this season, with temperatures down in the 30’s. It was a little sad-looking until the cold weather passed, but then came back admirably.
As with all chile peppers, they like warm weather and plenty of sunshine. I mentioned that you can grow these in containers easily, and Thai Hot could certainly be grown indoors under lights.
An an FYI, there is a larger variety, called Giant Thai Hot. I haven’t tried it yet, but the peppers get to about 2″ long, instead of the normal 1/2 to 3/4 inches. There’s also a version that has orange peppers instead of red.
Growing Peppers in Containers
Growing peppers in containers is easy, and most (if not all) peppers will thrive. In fact, some were selected for their ability to grow well in a pot! Let’s look at some things to consider when growing your peppers in a container.
Choose the Proper Size Pot
It’s not so much a problem with the pot being too big, but rather don’t go choosing one too small. Although many peppers don’t grow to more than 20″ tall, they still need enough room for their roots to spread out.
For the smaller peppers (under 12 ” tall), you’ll need a 2 gallon container. For the larger pepper plants, a 5 gallon or even 10 gallon container will give the peppers plenty of room to grow. Not sure what you need? Try a 3-gallon container and a good soil mixture with plenty of nutrients.
Oh, and remember — your container needs to have drainage holes, so excess water has a way to escape.
What Kind of Soil to Use
I prefer to use bagged soil, seeing as the soil in my yard is fairly sandy. I like a mixture of composted cow manure and organic potting soil. The composted cow manure feeds the plants, and the organic potting soil lets the plant’s roots grow freely. I generally use in a 50/50 ratio (just as much composted cow manure as potting soil).
I generally avoid any potting soil labeled as “african violet” or “houseplant” or any such designation. I also like to avoid pre-fertilized potting soil. If you can’t find any “regular” potting soil, try using sphagnum moss instead, at a ration of 40/60 (40% sphagnum and 60% composted cow manure). Here’s some more information on the kind of soil peppers like.
If you have access to real compost (meaning, from your own compost pile), by all means use that! Just make sure it’s fully “cooked” to destroy any lingering unfriendly bacteria or fungi.
Feeding and Watering
Your pepper plants will very likely need more frequent watering when being grown in a container, as well as more frequent fertilizing.
Watering should be done whenever you can stick your finger 1 inch into the soil and it’s dry (the tried and true method). Soon enough, you’ll get to recognize whether that means watering every day, every other day, etc. for your particular growing conditions.
I like to use my fertilizer at no more than 1/2 strength, but I fertilize a little more often — usually once every other week. When your pepper is first growing, it needs a fair amount of nitrogen, but once it starts producing flowers, it needs more phosphorus. I prefer doing things as organically as possible, so I like worm castings, fish emulsion and seaweed extract. (See the organic fertilizer and peppers post for more information.)
If I feel the plant needs a little boost of nitrogen or phosphorus (beyond the normal fertilizing), I’ll add in some blood meal (nitrogen) or bone meal (phosphorus). Both can be found in most garden centers.
I am debating adding an organic tomato fertilizer to this mix — after all, tomatoes and peppers are related and have similar requirements.
Staking or Caging
Some peppers may need to be staked or caged due to their growing habits. I usually find that bell peppers need to be staked, due to fruit weight. Large rangey plants like jalapenos may need to be caged if they start overtaking your container gardening area.
Ultimately, it’s up to you, especially since there are now peppers like Mohawk that are more of a draping/hanging pepper, instead of upright.
Those Really Hot Chile Peppers
Please keep in mind that if you decide to grow the really, really hot chile peppers (like scotch bonnet, habaneros, etc.), please don’t do it around small children or pets. Just touching the fruit of these plants can cause severe irritation and burning.
I also would recommend staking or at least caging such chile peppers, if they are in an area where people will potentially be walking near them. All you need to do is brush by the peppers to get the oil on your clothes/body.
And remember, when staking or caging the extra-hot chile peppers, please use rubber gloves — preferably the disposable kind. That’s a lesson I had to learn the hard way. (And naturally, also use the rubber gloves when harvesting the peppers.)
Growing Peppers in Containers is Easy!
That’s pretty much all you need to know about growing peppers in containers. This means that even if you don’t have a yard, you can have garden-fresh peppers. Just make sure that the spot where you plan to put the pots gets at least 8 hours of sun a day, and is in a warm spot (peppers like heat).
If you plan to grow your peppers from seeds, you may want to check out the growing peppers from seeds post. If your inclination is towards growing chile peppers, check out the growing chile peppers post.
Enjoy!